Sunday, 28 November 2010

Some food

A cup of coffee
First of all, the cup is initially made by lines. To start with, created the shape with the details as shown below, make sure all the vertices are set to smooth.


Apply Lathe modifier and set the parameters as below, so a rough cup shape is formed.


Add the handle by using line tool again and remember to tick for the Rendering. 

 
The same method as creating the cup, Lathe modifier is applied to the plate creation as well.


Add a teaspoon by starting with a box, convert it to Editable Poly and modify its shape similar to a spoon, and then apply TurboSmooth modifier.


Apply metal material for the spoon and the details are shown below.

 
Now it is time to add some coffee in the cup. Due to the shape of the cup, coffee is made with a Cylinder. Apply material as shown below.


A new technique adopted here is changing the Turbulence of the noise as well as applying Mapping to Shrink-wrap Environment in order to create the liquid effect of coffee.


Here comes a cup of coffee!


The eggs
Basically, the egg is created by a Sphere, before creating a cracked egg, clone two more eggs like the original one.


Select one of the eggs, clone and scale it down in order to have the shell of the egg. Apply Shell modifier to the outer cylinder and convert it to Editable Mesh. Select Polygon and drag some parts (as shown below) away from the other one, so that the egg is cracked!

Follow the same way to have more details of the egg by adding a few more pieces of shell fragments.


The container for egg—a nice basket
Start with creating a smooth line and apply Array method under Tool, set Array Dimensions ID to 25 and other parameters shown below, then a basic basket shape is formed.


Add a Circle on the top, set the parameters as below under Rendering, place the eggs in the basket, so the work is almost done.
 

Apply materials for the shell as shown below, the noise material plays an important role here.


Another material for the inside part of the egg is added: 

 
Apply material to basket:


So here is a basket of eggs!


Thursday, 25 November 2010

Furniture and stuff


Create a table 
Start with the table leg first by creating a rectangle and a curve with Line, make sure the curve is smooth by its vertex.

 
Use the loft method to get the following shape.

 
Clone three more of the existing shapes in order to create four legs for table.

 
Add a surface for the table as to create a lower layer. Delete the polygon in the middle with a box instead; apply the following material to the box, so that it will look like a glass table with wooden table frames. 

 
Select the Edge of the box and apply Chamfer to 2.00 to have the following shape. Delete the middle polygon ad Bridge the edges. Create another Box again and place it in the middle, apply the same glass material as above. So the table is done.


Create a chair  
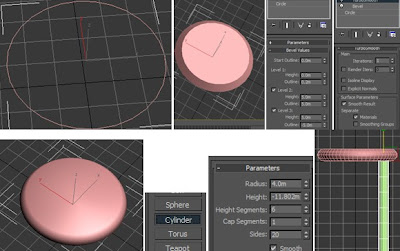
Create a chair by starting with the seat. First of all, draw a Circle and apply Bevel modifier by setting the following parameters, after that, apply TurboSmooth. Add a Cylinder to begin the work of chair leg.


Apply FFD 4x4x4 modifier in order to scale the Cylinder to a specific shape like below:


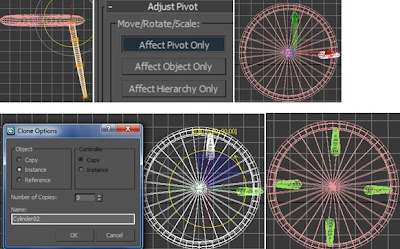
 Select the cylinder and adjust its Pivot, move it to the centre of the seat, the purpose for doing this benefit what I am going to do the later work. So now start to Clone three more cylinders around the seat by rotation tool. As is shown, there are four chair legs are created with the same distance to the centre and to each other.


Mirror two of the cylinders and move them upwards as to create a part of the back of the chair.

 
Draw a line between these cylinders, select Vertex and choose Smooth to form a smooth curve. Set the parameters under Rendering as below, so the line becomes more concrete. Clone five more lines to complete the back of the chair.


Afterwards, apply different material to the chair according to the details shown below:

 
At the end, do some further adjustment for the seat due to the stretched material at the edges, so the UVM Mapping modifier is adapted to avoid this problem.

 
So, the chair is done!


What is more…
A picture frame is added on the wall in order to occupy the room, in particular, it makes the room more like a ‘home’ when the camera zooms into the window.  It is basically made of ChamferBox,  then convert it to Editable Poly. Apply two Bitmaps in the material editor - one is for the picture while the other one is for the frame. At the end, apply UVW Mapping modifier to adjust the layout of the material assigned on the object.


A picture frame is done!


Assign materials to the room
 
Wallpaper 

Brocks
Floor/ carpet
Door & window
 
Apply UVW Mapping modifier to each object to assure the material has been assigned properly, then the basic environmental stuff work out as below:


Tuesday, 23 November 2010

Create a room

Building up a room

First of all, create a wall in top view with Wall tool under the AEC Extended under command panel, but before that, make sure the Grid Points has been ticked under the Grid and Snap Settings, as it assure the wall goes straight and is easier to see the joint part with grid point on. Adjust the shape of the wall by vertex, then a basic wall is done.


Add a window
Create a window with Casement tool under the Windows under Command Panel with the following parameters. Set the casement to “ Two”, so that there are two window glasses, set Open value to 0%, meaning the window is closed while 100% means window is entirely open. The reason why I chose this type of window is because it looks more like the one from 50’s.


Add a door
Create a Pivot under Doors. To be honest, door creation is the difficult part, as I got problem with having the door embedded into the wall, so when I tried to open the door, I could still see the wall in it. Therefore, as finally I ended up with having the following settings, then the door worked well.


Add the floor
Here the floor was added by using line tool; follow the edge of the wall to draw the line and Close Spline at the end. Again, make sure the Snaps Toggle is on, so that the line will be drawn straight, which also makes it easier to join two points together. Convert the line to Editable Poly, then the floor with a specific outline has been created. Clone it to have the roof, due to exactly the same shape between floor and roof.


Add curtain
The curtain is basically done with loft method. Start with create three different curves with Point Curve tool under NURBS Curves as shown below, and then click on the button “NURBS Creation Toolbox” under NURBS Curves, a small window pops up, under this window, click the button “Create U loft curves” at the right bottom, then a basic window outline is formed, adjust the shape again by Point. Afterwards, add a pole (for hanging the curtain) on the top of the window by creating a cylinder.
 

Mirror the existing curtain to have other side one now.


Saturday, 20 November 2010

Radio modeling continues...

As is shown below, as I zoom in the radio, there are small holes are found on the surface, which are formed by unwanted vertices, after removing all those useless ones, the surface become entirely smooth.

 
Also, UVW mapping modifier plays a significant role during applying material process, as is shown below, the material is stretched and it is difficult to see the texture of the material. Therefore, UVW Mapping is adopted to assure that the material has been assigned to the object properly. Here Box Mapping is used due to the shape of the radio.

 
A big work is to create the stripe with the method of Extrude the polygons to a specific height value (-1.5), which is one of the main features of the chosen radio and occupies half space of the front side. As I realize that there is no shortcut to clone the stripe, so I did all the stripes one by one, including the ones at the back. Finally the stripes give some depth to the radio and look perfect with the texture as well.

 
The logo has been created by using Text tool with Segoe UI Bold Italic font, after that apply Bevel modifier.

 
Time to create the buttons…
Again, create the buttons with ChamferBox; for the “play” symbols or signs on the button, I used the Box and then reduce one corner (two vertices) to create a triangle, and then Boolean it.

 
Doing the same for the other two buttons: stop button and pause-play button.

 
The buttons after applying metal materials:

 
The other buttons such as volume controller and channel control will be created by using Spindle basically. Ring and Connect the edges in order to have more details, the new edges after Connected are scaled down to have the gears around it. Apply material or colours respectively.


For the other part of the radio, the material details are shown as follows:

General radio material:
 
White/ metal part of the radio:
 
The channel
 
The stripe
 
Bush logo
 
The final radio prototype