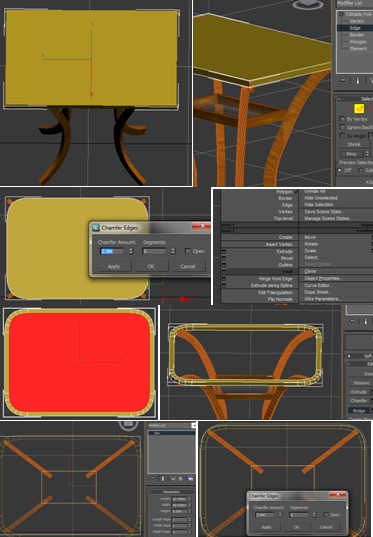
Create a table
Start with the table leg first by creating a rectangle and a curve with Line, make sure the curve is smooth by its vertex.

Use the loft method to get the following shape.

Clone three more of the existing shapes in order to create four legs for table.

Add a surface for the table as to create a lower layer. Delete the polygon in the middle with a box instead; apply the following material to the box, so that it will look like a glass table with wooden table frames.


Select the Edge of the box and apply Chamfer to 2.00 to have the following shape. Delete the middle polygon ad Bridge the edges. Create another Box again and place it in the middle, apply the same glass material as above. So the table is done.
Create a chair
Create a chair by starting with the seat. First of all, draw a Circle and apply Bevel modifier by setting the following parameters, after that, apply TurboSmooth. Add a Cylinder to begin the work of chair leg.
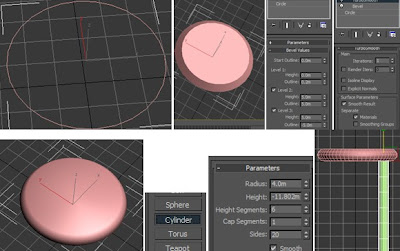
Apply FFD 4x4x4 modifier in order to scale the Cylinder to a specific shape like below:

Select the cylinder and adjust its Pivot, move it to the centre of the seat, the purpose for doing this benefit what I am going to do the later work. So now start to Clone three more cylinders around the seat by rotation tool. As is shown, there are four chair legs are created with the same distance to the centre and to each other.
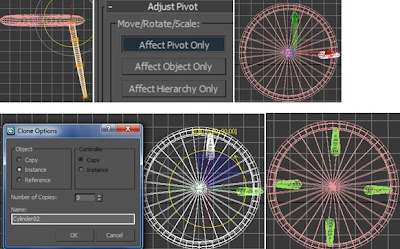
Mirror two of the cylinders and move them upwards as to create a part of the back of the chair.

Draw a line between these cylinders, select Vertex and choose Smooth to form a smooth curve. Set the parameters under Rendering as below, so the line becomes more concrete. Clone five more lines to complete the back of the chair.

Afterwards, apply different material to the chair according to the details shown below:

At the end, do some further adjustment for the seat due to the stretched material at the edges, so the UVM Mapping modifier is adapted to avoid this problem.

So, the chair is done!

What is more…
A picture frame is added on the wall in order to occupy the room, in particular, it makes the room more like a ‘home’ when the camera zooms into the window. It is basically made of ChamferBox, then convert it to Editable Poly. Apply two Bitmaps in the material editor - one is for the picture while the other one is for the frame. At the end, apply UVW Mapping modifier to adjust the layout of the material assigned on the object.

A picture frame is done!


No comments:
Post a Comment